In this walkthrough, you will learn how to set up a warehouse location that uses non-directed picks and put-aways, and will see how warehouse receipts and shipments are handled.
A warehouse location is when a location requires warehouse documents such as warehouse receipts and warehouse shipments, when receiving and shipping goods. Non-directed put-aways tell warehouse employees where to put items, and non-directed picks tell warehouse employees where to pick items from.
 Function Background
Receiving
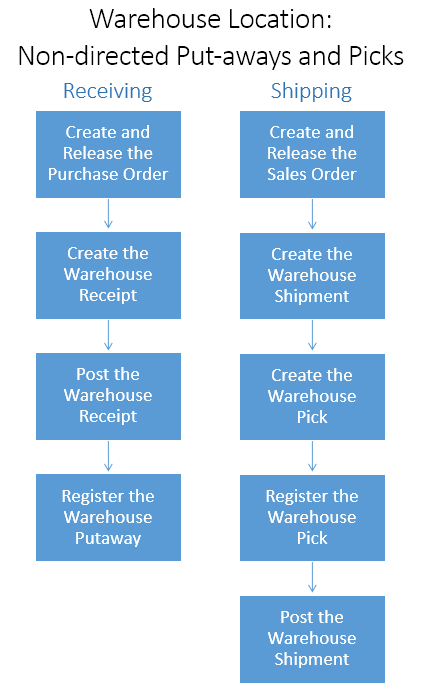
When a location is set up as a warehouse with non-directed put-aways, and you're receiving items, the process is as follows:
Release the Purchase Order: When the items are received in the warehouse, the user who is responsible for receiving will release the purchase order to signal warehouse employees that the received items can be picked from the RECEIVE bin and put away in inventory.
-
Create the Warehouse Receipt: In the Warehouse Receipt window, the employee who is responsible for receiving items fills in the Qty. to Receive field.
-
Post the Warehouse Receipt: The employee posts the warehouse receipt. A put-away activity is created, which shows where the items should be placed in the warehouse.
-
Register the Warehouse Put-Away: On each line for items that have been put away, the warehouse employee fills in the Quantity field in the Warehouse Put-away window, and then registers the warehouse put-away.
Shipping
When a location is set up as a warehouse with non-directed picks, and you're shipping items, the process is as follows:
Release the Sales Order: When the user who is responsible for the sales order is ready to ship the order, the sales order is released to signal warehouse employees that the sold items can be picked and placed in to the SHIP bins.
-
Create the Warehouse Shipment: In the Warehouse Shipment window, an employee fills in the Qty. to Ship field.
-
Create the Warehouse Pick: The warehouse pick document is created, which shows from which bins to pick the items.
-
Register the Warehouse Pick: On each line for items that have been picked, the warehouse employee fills in the Quantity field in the Warehouse Pick window, and then registers the warehouse pick.
-
Post the Warehouse Shipment: When all items on the warehouse shipment document are registered as picked from the specified shipment bins, an employee posts the warehouse shipment.
About This Walkthrough
This walkthrough provides an overview on how to do the following:
- Create a Warehouse Location
- Create a location
- Add bins to a location
- Assign bins to a location
- Set up inventory postings
- Generate a Warehouse Receipt and Put-away
- Generate a warehouse receipt
- Register the warehouse put-away
- Generate a Warehouse Shipment and Pick
- Generate a warehouse shipment
- Register the warehouse pick
Story
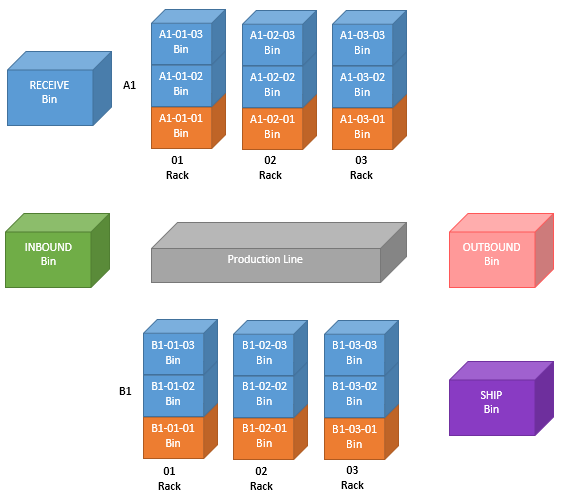
The JF company manufactures and sells YOGIES chocolates from its SEATTLE location. Raw materials are purchased, and then used to produce finished goods, which are then sold.
The raw materials are purchased from a vendor, received at the warehouse, placed into the RECEIVE bin, and then put-away in the A1 bins. Once a finished good is manufactured, it is sold to a customer, picked from the B1 bins, placed into the SHIP bin, and then shipped from the warehouse.
For this walkthrough, the SEATTLE location uses the following bins:
- RECEIVE: Holds items that have just been received.
- A1-##-##: Holds raw materials. Received items are taken from the RECEIVE bin, and placed in the A1 bins.
- B1-##-##: Holds finished goods. Once items have been produced, they are placed in the B1 bins. The B1-##-01 bins are primary bins. Sold items are picked from the primary bins, and placed in to the SHIP bin.
- SHIP: Holds the items that are ready to be shipped.
Creating a Warehouse LocationThe following procedures explain what needs to be done in order to create a warehouse location that uses non-directed put-aways and picks.
To Create a Location
The SEATTLE location needs to be created.
In the Search box, enter locations, and select Locations.
Click New.
In the Code field, enter SEATTLE.
-
Enter the appropriate information in the fields on the General and Communication FastTabs.
-
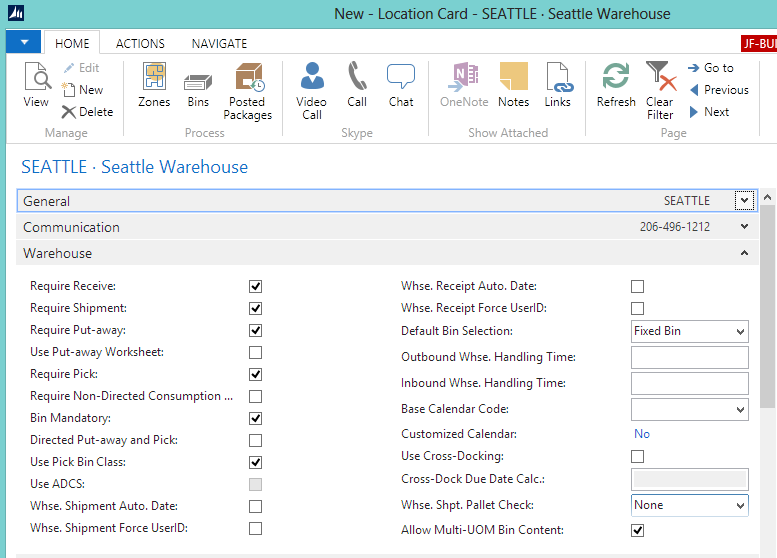
On the Warehouse FastTab, select the following check boxes:
Require Receive: Warehouse receipts must be used when receiving a purchase order
-
Require Shipment: Warehouse shipments must be used when shipping a sales order.
-
Require Put-away: Put-away activities must be performed in the warehouse at this location.
-
Require Pick: Pick activities must be performed in the warehouse at this location.
-
Bin Mandatory: Bins need to be used in all transactions with items.
-
Use Pick Bin Class: Indicates that values in the Pick Bin Class field on the Bin window will be used to determine which bins to pick from. Works with the Pick From Bin Class field on the Bin Policies FastTab.
-
Allow Multi-UOM Bin Content: Allows bins to contain items with multiple units of measure (UOMs).
To Add Bins to a Location
You need to add bins to the SEATTLE location. You'll be adding the bins used to receive, put-away, pick and ship.
The RECEIVE bin is for when you receive items from a purchase order. The A1 bins are for putting the items that were received. For JF Company, raw items are received in the RECEIVE bin and put away in the A1 bins.
The SHIP bin is for when you ship items from a sales order. The B1 bins are for picking items that will be shipped. For the JF Company, finished good items are picked from the B1 bins and then shipped from the SHIP bin.
From the SEATTLE Location Card window, choose Bins on the Home tab. The Bins window opens.
Add the following records:
When bins are assigned to a location, you can select which bins are picked from based on the Pick Bin Class. In this walkthrough, selecting Primary for the Pick Bin Class field means that when picking, JustFoodERP will only look at the Primary bins. Secondary bins can be used for replenishment.
Code Pick Bin Class A1-01-01 Primary A1-01-02 Secondary A1-01-03 Secondary A1-02-01 Primary A1-02-02 Secondary B1-01-01 Primary B1-01-02 Secondary B1-01-03 Secondary B1-02-01 Primary B1-02-02 Secondary B1-02-03 Secondary B1-03-01 Primary RECEIVE SHIP 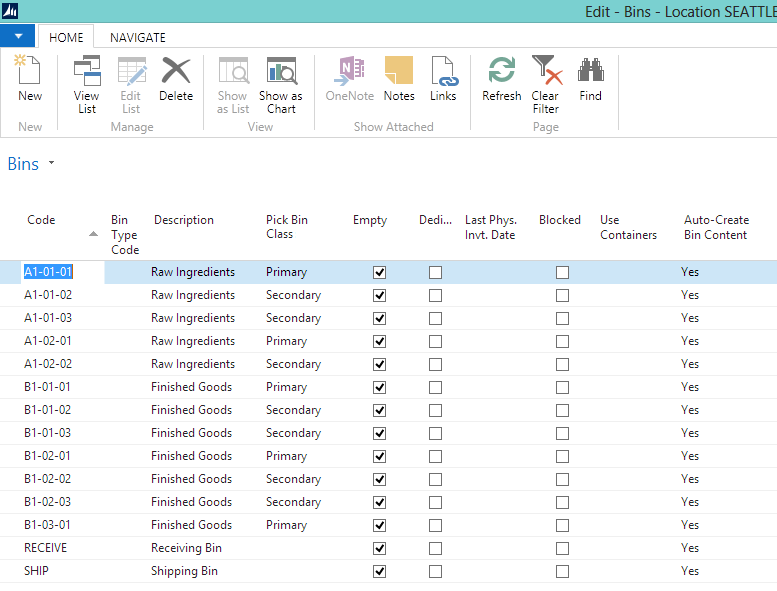
Click OK.
The bins are now associated with the SEATTLE location.
To Assign Bins to Location
Once the bins are created, you need to assign certain bins to the SEATTLE location.
From the Location Card window, go to the Bins FastTab.
-
In the Receipt Bin Code field, select RECEIVE. When you create a warehouse receipt, JustFoodERP fills in the header with this bin code, and it is copied to the Bin Code field on the Take line of the resulting warehouse put-away.
In the Shipment Bin Code field, select SHIP. When you create a warehouse shipment, JustFoodERP fills in the header with this bin code, and it is copied to the Bin Code field on the Place line of the resulting warehouse pick.
Assign policies for the bins used in picking:
On the Bin Policies FastTab, select the Allow Breakbulk check box. This allows a larger unit, such as a case, to be broken in to a smaller unit, such as pounds.
Select the Pick According to FEFO check box. This means you would like to use the First-Expired-First-Out (FEFO) method to determine which item-tracked items to pick.
In the Pick From Bin Class field, select Primary. This means that only bins that have been designated as Primary can be picked from.
Click OK. The location is saved and the Location Card is closed.

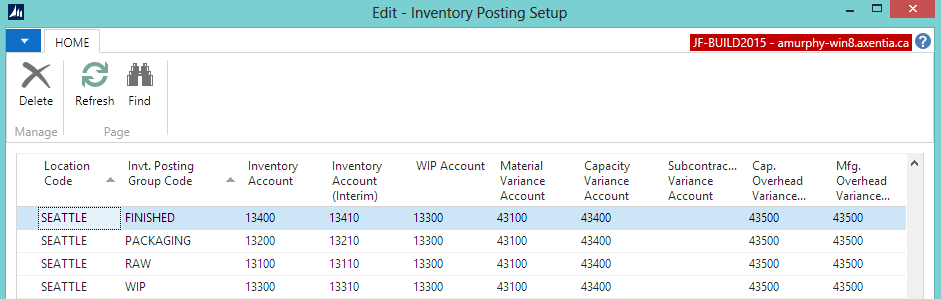
To Set up Inventory Postings
If you are using Inventory Posting Groups for the items that you're purchasing and selling, then you need to set up the inventory postings for your location. You need to enter the inventory posting groups and location, and then link the combination to general ledger accounts.
Prerequisites
- Inventory Posting Group Codes are set up
- G/L Accounts are set up
In the Search box, enter inventory posting, and select Inventory Posting Setup.
-
Add the following records:
Location Code Invt. Posting Group Code SEATTLE FINISHED SEATTLE PACKAGING SEATTLE RAW SEATTLE WIP
-
Assign the G/L accounts to each record.
-
Click OK.
Generating a Warehouse Receipt and Put-Away
This section shows how the location settings affect warehouse receipts and put-aways. It is not meant as a detailed explanation of how to enter all of the details for warehouse receipts and put-aways.
Prerequisites
Create a warehouse location that uses non-directed put-aways and picks.
-
Employee is set up as a warehouse employee for the SEATTLE location
-
Purchase order has been created and released for an item at the SEATTLE location.
To Generate a Warehouse Receipt
Since the Require Receive check box was selected for the SEATTLE location, a warehouse receipt is required to receive items.
In the Search box, enter purchase orders, and select Purchase Orders. The Purchase Orders window opens.
-
Select the released purchase order for the SEATTLE location. In this case, PO00026387.
-
On the Actions tab, in the Warehouse group, choose Create Whse. Receipt. If you try to enter a value in the Qty. to Receive field on the Lines FastTab of the purchase order, you will receive a warning that says "Warehouse Receive is required."
-
Click OK at the message that a Warehouse Receipt Header was created. The Warehouse Receipt window opens.
-
On the Lines FastTab, enter values in the Qty. to Receive fields.
-
Assign lot numbers to all of the item lines.
-
On the Home tab, in the Process group, click Post Receipt.
-
Click Yes at the question asking if you want to post the receipt.
-
Click OK at the message that a source document was posted, and a put-away activity was created. The Post Whse. Receipt window opens.
To Register the Warehouse Put-Away
Since the Require Put-away check box was selected for the SEATTLE location, put-away lines were automatically generated when the warehouse receipt was posted.
The warehouse employee can see where the items need to be moved to. Once the items are moved to new bins, the warehouse employee can use JustFoodERP or Floor to register the put-away so that JustFoodERP is updated to reflect the move.
Open the posted warehouse receipt if it is not already open
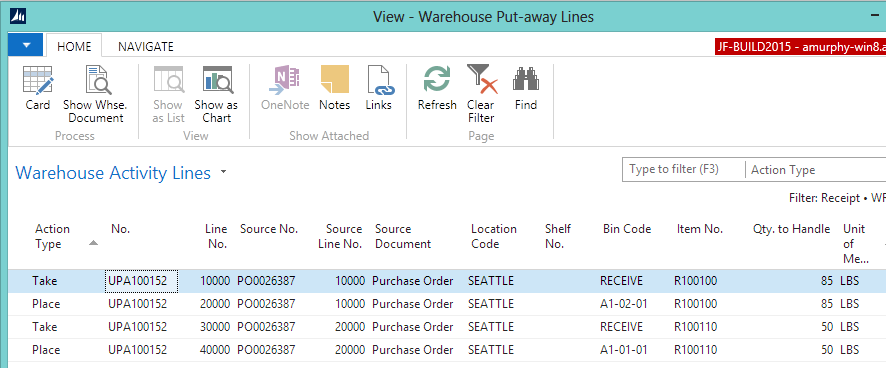
On the Navigate tab, choose Put-away Lines. The Warehouse Put-away Lines window opens.
The lines show the following
Take the R100100 item from the RECEIVE bin, and place it into the A1-02-01 bin.
-
Take the R100110 item from the RECEIVE bin, and place it into the A1-01-01 bin.
-
On the Home tab, in the Process group, choose Card. The Warehouse Put-away window opens.
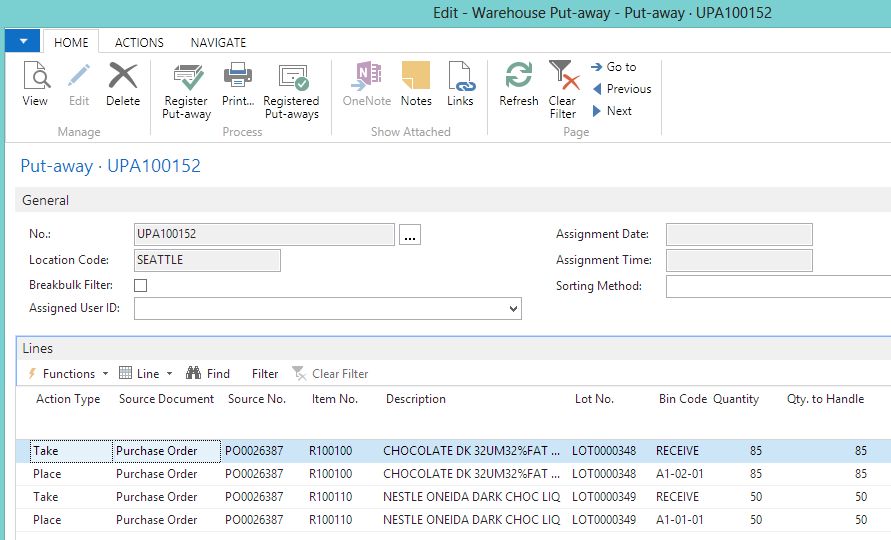
-
On the Home tab, in the Process group, choose Register Put-away.
-
Click Yes to register the Put-away document. The items are moved to appropriate bins in JustFoodERP.
Generating a Warehouse Shipment and Pick
This section shows how the location settings affect warehouse shipments and picks. It is not meant as a detailed explanation of how to enter all of the details for warehouse shipments and picks.
This section contains the following procedures:
Prerequisites
Create a warehouse location that uses non-directed put-aways and picks.
-
Employee is set up as a warehouse employee for the SEATTLE location
-
Sales order has been created and released for an item at the SEATTLE location.
To Generate a Warehouse Shipment
Since the Require Shipment check box was selected for the SEATTLE location, a warehouse shipment is required to ship items.
-
In the Search box, enter sales orders, and select Sales Orders. The Sales Orders window opens.
-
Select the released sales order for the SEATTLE location. In this case, SO143072.
-
On the Home tab, in the Process group, choose Create Whse. Shipment. If you try to enter a value in the Qty. to Ship field on the Lines FastTab of the sales order, you will receive a warning that says "Warehouse Shipment is required."
-
Click OK at the message that a Warehouse Shipment Header was created. The Warehouse Shipment window opens.
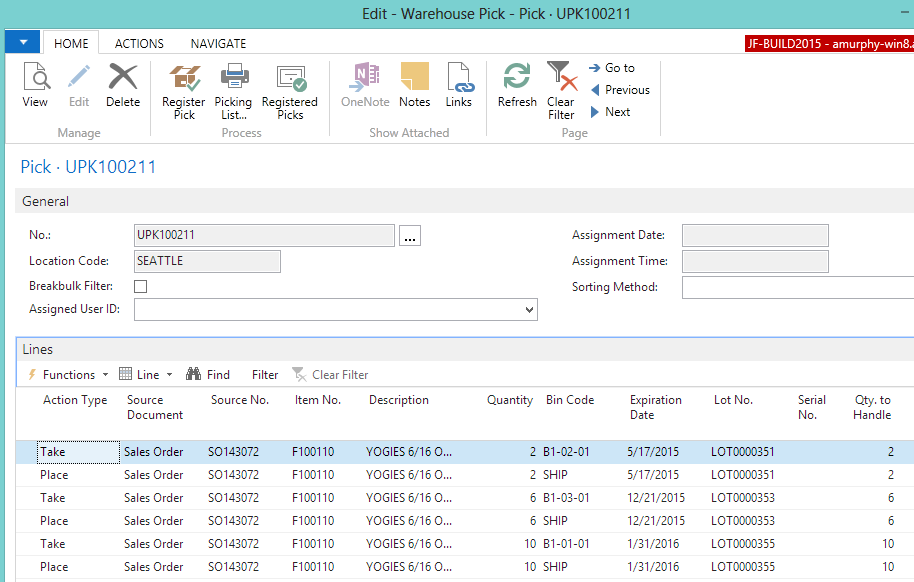
To Register the Warehouse Pick
Since the Require Pick check box was selected for the SEATTLE location, you need to generate the pick, which will tell you what items to pick to fulfill the order.
Once the pick is created, the warehouse employee can see where the items need to be picked from. Once the items are picked and moved to the SHIP bin, the warehouse employee can use JustFoodERP or Floor to register the pick so that JustFoodERP is updated to reflect the move.
Open the warehouse shipment if it is not already open.
-
On the Home tab, in the Process group, choose Create Pick. The Whse. Shipment-Create Picks window opens.
-
Click OK. The pick is generated.
-
On the Navigate tab, choose Pick Lines. The Warehouse Pick Lines window opens.
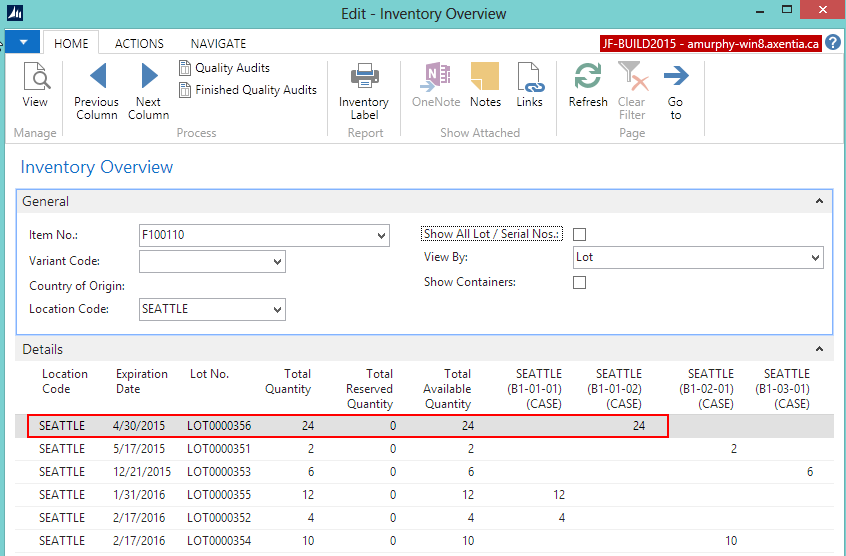
The lines show to take the F100110 item from several different bins since a single bin did not have enough inventory to fill the order. The items were picked based on which items expired first since the SEATTLE location was set up to pick according to First Expiry-First Out (FEFO).
-
On the Home tab, in the Process group, choose Card. The Warehouse Pick window opens.
-
On the Home tab, in the Process group, choose Register Pick.
-
Click Yes to register the Pick document. The items are moved to the SHIP bin in JustFoodERP. You can now post the warehouse shipment.
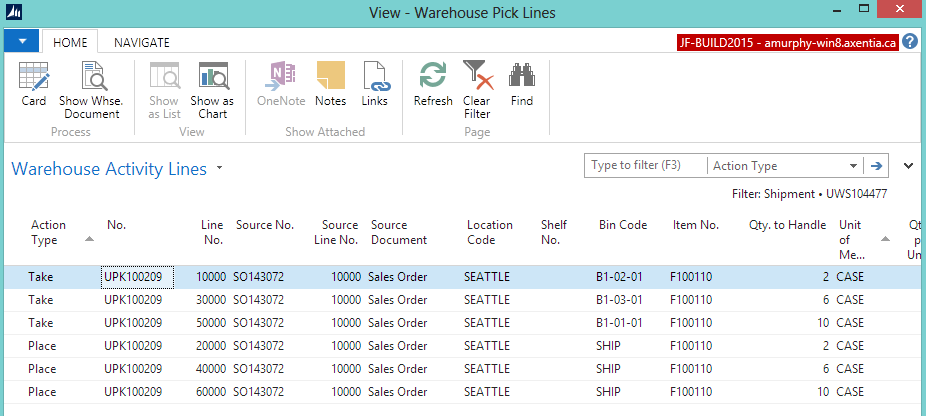
You can see, from the inventory overview for the F100110 item, that the inventory in the B1-01-02 bin expires first. But when setting up the bins, B1-01-02 was set as a Secondary bin, and the SEATTLE location was set up to only pick from Primary bins. As a result, the items in the B1-01-02 bin were not picked.